Article first appeared in “Home
Improvement,” Fall 2001, CNC/Herald Media Publishing,
Boston.
Feel like your walls are crowding in on you?
Fed up with the color? Bored with the view from your sofa or dining
table? Well, take heart, because there are several solutions.
Any designer will tell you the fastest, most
effective and least expensive way to get a brand new look is with color —
paint. While most of us have rolled-out a wall or ceiling in our time, there’s
one artistic endeavor that some are hesitant to try — faux finishes — those
fabulous vertical, two-dimensional tricks that add so much pizzazz to a
room.
Faux finishes are nothing new. They’ve been around
for centuries. There’s marbling, stippling, sea-sponging, color-washes, and
perhaps the most popular faux finish of all, wood graining. Nothing takes the visual chill off a room
like wood. But wood can be expensive
and some may just prefer to try their hand at improving nature and create the
wood and grain themselves.
Wood is not static, it’s alive and breathing, but like most things that grow old—the
look of it, its complexion so to speak—tends to fade. Besides, not all wood was born with great beauty.
And like ordinary good looks, all over the
universe, man will always try to improve upon it.And so it is with art and wood: if we don’t like the grain and
color of the wood, we are free to create one we do like!
You have a decorating project in mind. You’d gladly
annihilate all the mind-numbing off-white walls in order to add the rich patina
of wood instead.Yes, you can pay
artists the big bucks to do it for you (with little margin for error) but there
are probably more do-it-yourselfers willing to risk a try.
In order for rank amateurs to do it properly,
relatively speaking, we contacted a painting and decorating contractor whose
company spans more than 130 years of experience the family owned and operated firm of
J.W. Graham, Painters and
Decorating Contractors of Weymouth and Holbrook, just a few miles south of
Boston, MA. According to owner, Joe
Vitello feels that some faux finishes are best left to the professionals but
encourages people to try their hand at it if they’re willing “to learn, make
mistakes, and experiment a little.”
“It’s best to practice on a board, plywood or
something inexpensive, and try a few strokes, some graining and combing,”
Vitello said. See if it’s a project you
want to pursue. If not, call in the experts. But if you do make it a DIY project, stick with it and don’t expect
perfection the first time around, just try to enjoy the process,” he said.
A finished oak door can cost as little as $700 for
the most basic door and can skyrocket from there. A metal door, on the other hand, probably
won’t be much more than
$400 and Vitello explained that working on an old wood or metal door is a good
place to start.
So how do we get a metal door or a beat-up existing
door (or wall) to look like a million? To start, wood-graining kits can be bought in any paint store, artist
supply store, and larger hardware stores. There’ll be a graining comb that’s
used to create the striated effect, those lines within the wood that span the
length of it. And the graining roller
is made precisely to affect the random swirls that occur naturally in wood
grain.
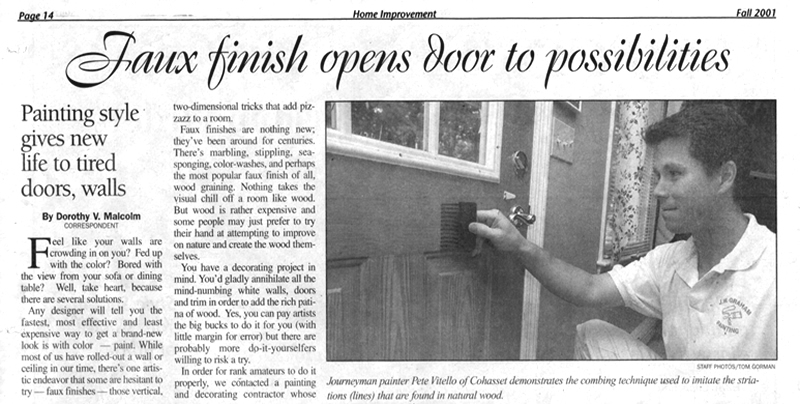
Vitello
further explained, “The method is a four-step process that should be followed
precisely, especially when first starting out, in order to get a decent
result.” He strongly recommends
studying the formations in natural wood, the striations (lines) and swirls that
occur naturally in real wood.
Step 1. Sand until smooth, your door or wall or craft item to be
finished. Wash, rinse off and allow to
dry thoroughly. Apply a “low sheen or
satin” (but not flat), oil-base primer/ base coat. Let that dry thoroughly — about 24 hours.
Step 2. Lightly sand again with about
#220-grit sandpaper. Brush or vacuum off the wood dust.
With
a natural-bristle brush, stroke on the oil-base glaze (the wood-graining
liquid). Ask the paint or hardware store clerk to tint it a darker shade than
the base coat/background color.
If you want
your door, wall or craft object to look like oak, then choose a beige or tan
background color for the primer/base coat.
For a darker
finish, like mahogany, choose a light, reddish-brown shade for the primer/base
coat background color.
For walnut,
go with a medium-brown background color-base coat.
While still wet — let the art begin!
Remember,
the graining comb creates the striated effect, those lines found within natural
wood that spans its length...and
The graining roller is
made precisely to affect the random swirls that occur naturally in wood.
Utilize the
“wood graining technique” with the comb and roller that comes in the kit. Lightly apply the comb to the wet surface of
your door or wall and gently drag it downward.
NOTE: If it doesn’t look right or good to you,
promptly wipe it off with a clean, lint-free cloth. Oil-base paint is forgiving when a mistake is made because it
takes longer to dry and set than water-base paints.
You can alternate too,
comb-swirl-comb-swirl, to get a natural, richly-grained look.
Keep experimenting with
the comb and the graining roller until you discover a grain/look you find
appealing.
Continue in a “randomly
consistent” pattern, but remember, it doesn’t have to be perfect to look
natural.
Let
dry thoroughly, 15-24 hours.
Step 3. Don’t forget to lightly sand again, between coats, with
#220 grit sandpaper. Brush or vacuum
off dust.
Next
comes the “blending liquid.” This is a semi-gloss, oil-base varnish that’s
tinted with universal colors (your choice, have the clerk tint it for you).
This interesting part of the process mellows the wood and makes it appear much
more organic — it literally blends the base coat with the graining coat, sort
of like morphing the varnish into an integrated whole fashioning the look of
natural wood and grain.
Apply with
a brush (natural bristles).
Let
dry thoroughly, 15-24 hours.
Step 4. Again, lightly sand between coats with about a #220-grit
sandpaper. Brush or vacuum off dust.
Apply
a clear, oil, semi-gloss or high-gloss varnish. If it’s a door or wall that
sees a lot of traffic, you may want to apply another coat of clear, oil-base
varnish.
NOTE: The higher the gloss the greater the
durability.
Let
dry thoroughly, about 24 hours.
Boston-based contractor
and master painter Joe Vitello recommends: “Use a gentle touch.
And don’t forget to always lightly-sand and clean-off between
coats.” He suggests working with poplar as a good wood to
experiment with because it’s inexpensive and lends itself
beautifully to wood faux finishing. “Poplar can end up looking
like a dead-ringer for oak, mahogany or cherry. It’s a great
wood to work with.” He also recommends explaining clearly
and thoroughly to the paint store clerk exactly what it is
you hope to achieve with your DIY faux finish project.
With patience, a little practice,
and the need for the natural beauty of wood to grace your surroundings, a
wood-grain faux finish may be just the decorating project to tackle this fall.
|